How to Burn Files to Dvd Windows Xp
Z7_3054ICK0KGTE30AQO5O3KA30N0
hp-concentra-wrapper-portlet
![]() Actions
Actions
HP and Compaq Desktop PCs - Drive Cannot Read Discs (Windows XP, ME, and 98)
This document applies to HP and Compaq Desktop computers with Windows XP, Me, and 98.
Use the steps in this document to troubleshoot problems with CD and DVD drives reading discs.
Before you begin
If the drive cannot read discs that were made from a record label or from a software company, skip this section.
If the drive in your computer cannot read discs that were burned on another computer or drive, read the following:
-
Make sure the burned discs are able to play back from the computer they were burned from.
-
Make sure the disc type is compatible with both systems (CD-R, DVD+R, etc...) See the document CD and DVD Format Information.
-
Make sure the disc burning session was closed after the disc was finished. See the help section in the disc burning software that was used to burn the disc.
-
Make sure that you have tried burning the disc at a lower speed. Even though the disc type may be compatible with a 16x burn rate, the playback may be much less compatible in other drives. Try burning the disc at 4x before playing it from the computer.
-
Make sure that you have tried at least three discs that each use a different brand of blank media.
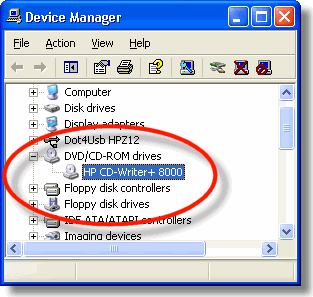
Step 1: Checking if the drive is in Device Manager
If you can see the drive in Windows or you know that the drive plays some discs, skip this section.
-
In Windows XP, click Start, and right-click My Computer.
In Windows 98 and Me, right-click My Computer.
-
In Windows XP, select Properties, click the Hardware tab, and then click the Device Manager button.
In Windows 98 and Me, select Properties, and click the Device Manager tab.
-
Click the plus sign (+) next to DVD/CD-ROM Drives (or similar) category.
-
If the CD or DVD drive is not showing up in Device Manager, close Device Manager and continue using these steps to troubleshoot.
Step 2: Checking discs
For the purposes of troubleshooting, get several discs that were manufactured from a record label or from a software company before you use this document. Make sure that the disc can be played from a DVD or music player (but not your PC).
-
Place a music CD into the CD or DVD drive and try to play it with Windows Media Player. Do this more than once with different discs and note what happens.
-
Place a software CD (like a game or business software) into the CD or DVD drive. Do this more than once with different discs and note what happens.
If several discs work but one does not, the disc is probably bad or is scratched. Clean the CD or change the disc with one of another type.
-
If the disc can be read in another drive, the disc and the software program used to play the disc are good.
-
Use the disc in another CD or DVD drive using different software players (if possible).
-
If the disc cannot be read in any drive, the disc is probably bad or needs to be cleaned.
-
If you have Windows 98 or Me, you can reinstall Windows Media Player as follows:
-
Turn on the computer, press the F8 key repeatedly when the logo screen appears.
-
Select Safe Mode and press Enter.
The computer starts in Safe mode.
-
Delete the Windows Media Player folder from My Programs.
-
Empty the Recycle Bin.
-
Restart the computer.
-
Try opening Windows Media Player to see if it opens. If it does, repeat these steps.
-
Click Start, Run, and type the following into the Open field: opendll32.exe setupapi, InstallHinfSection InstallWMP7 132 c:.inf
-
Click OK.
If prompted for a missing file, browse to c:\Windows\i386, or c:\i386.
-
When done, open Windows Media to see if it works properly.
-
Step 3: Permissions in XP
In Windows XP Professional or Windows Media Center edition, ensure that you have permissions enabled to use the CD or DVD. If you are not using Windows XP Professional or Windows Media Center edition, skip this step.
note:In order to use these steps, you must have administrative privileges and sharing has to be enabled.
-
Remove any discs from their drives.
-
Make sure that simple file sharing is not set:
-
Double-click My Computer, and click Tool from the menu bar.
-
Select Folder Options, and click the View tab.
-
Scroll down to the bottom of the list of Advanced Settings and remove the checkmark from Use simple file sharing.
-
Click OK.
-
-
Open My computer, right-click the drive containing a disc, and select Properties.
-
Click the Sharing tab (Share this folder should be selected), and then click the Permissions button.
-
If you cannot see a sharing tab, select your logon name under Groups and user names. If you can not find it, then select Everyone.
-
Make sure that Deny is not selected next to read. If it is, select Allow and the drive should work.
-
Click OK to close the window.
Step 4: Reading the disc from a command prompt
Confirm that the drive can read discs from a command prompt. If your PC does not have a recovery partition on the hard drive, skip to the next step (if you are not sure that your PC has a recovery partition, perform the steps anyway to find out if a recovery partition exists). Use the following steps to read a data disc from a command prompt:
caution:Use the following steps carefully. Do not try to skip ahead without reading the steps. Failure to perform all of the steps in the required order might cause serious loss of data on the hard drive.
-
Turn on the computer, and press the F10 key repeatedly at the logo screen until Starting HP PC System Recovery (or similar) appears at the bottom of the screen.
If, after two or three attempts, you cannot enter a system recovery screen, your computer does not have a recovery partition. Skip to the next step if this is the case.
-
Read and respond to the recovery screens until an Advanced Options button is shown. Click the Advanced Options button.
note:
The initial recovery screens might offer choices to open System Restore or run diagnostics. Do not use these features at this time. You may also need to select Start Recovery and OK to get to the Recovery Screen containing the Advanced Options button.
A System Recovery - Quick Format (or similar) window appears. Do NOT click Next.
-
Press the Alt + D keys.
A command prompt window appears.
-
Insert a disc that contains files into the drive that is having the problem. Use a type of disc that is not being recognized in the drive. Good discs to use are game or software discs that were purchased from a store. Do not use music discs. If the DVD drive can read CDs but not DVDs, insert a DVD movie.
-
Wait about 20 seconds for the disc to achieve full spin velocity.
-
Type the following at the command prompt: diskpart
-
Enter list volume at the command prompt.
Figure : Command Prompt window

-
Press Enter and look at the list. Find and remember the drive letter next to the CD or DVD drive that contains the disc.
-
Type Exit and press the Enter key to return to the command prompt.
-
Type the drive letter for the drive that contains the disc followed by a colon (:). For example, if the drive letter was listed as J in the diskpart list, you would type the following: J:
-
Press Enter and type the following at the new command prompt: dir
-
Do one of the following tasks depending on what is shown on the screen:
-
If a list of filenames and folders is shown on the screen, the disc data is recognized by the drive. The issue is not likely related to the drive or the disc. It is probably related to the software configuration in Windows. Continue troubleshooting.
-
If the message "device is not ready" is shown or the screen fails to update after 30 seconds, the disc or the drive may be bad. Repeat these steps with a few other discs of the same type to make sure the problem is not related to the disc. If other discs of the same type cannot be read, skip to Step 8 to test the drive to see if the drive has truly failed.
-
Step 5: Reinstalling the drive in Device manager
Remove and reinstall the drive name in Device Manager:
-
In Windows XP, select Properties, click the Hardware tab, and then click the Device Manager button.
In Windows 98 and Me, select Properties, and click the Device Manager tab.
-
Click the plus sign (+) next to DVD/CD-ROM Drives (or similar) category.
-
Close the Properties window and select the CD Drive name.
-
Click the Uninstall or Remove button (in Windows XP this is the square button with a red X).
-
Click Yes or OK to remove the CD or DVD listing. Do not restart the computer.
-
Close Device Manager and restart the computer.
-
Use the CD or DVD drive that was used when the error appeared. If the error no longer appears, you are done. If the error re-appears, continue to the next step.
Step 6: Use System Restore
If the computer still cannot read the disc, use System Restore to go back to a time when the drive was recognized by Windows. This step is only for Windows Me and XP. If you do not know how to restore Windows, use the Support document "Using Microsoft's System Restore Feature."
When done, use the CD or DVD drive again to see if it works. If it works, you are done. If it does not, go to the next step.
Step 7: Recovery
If the PC still cannot read the disc, recover the computer. If you do not know how to recover the computer, use one of the following documents:
- If your Presario computer came with quick restore discs, insert the first disc into the top CD or DVD drive, restart the computer, and follow the onscreen instructions.
When done, use the CD or DVD drive again to see if it works. If it works, you are done. If it does not, go to the next step.
Step 8: Using hardware diagnostic software to test the drive
If the drive still cannot read the disc, use hardware diagnostic software to help determine if the drive has failed. If your computer has Windows XP and is still using the same software configuration, the computer might have a software program called PC-Doctor. If so, use the steps that follow to test the drive. If you have changed upgraded the operating system or have a computer that came with Windows Me (or earlier) you can search the Internet for free diagnostic utilities or take the computer into a local service center to have the drive tested.
-
Click Start, Run, and type the following into the Open field: pcdrw32
-
Click OK and wait for the PC-Doctor window to appear.
-
Open the appropriate CD/DVD-ROM test from the list of tests (as in the column to the left of the first menu).
If an error code is reported, the computer may need to be serviced. Open the test again to confirm the error code. Use the following support document if you need more information about PC-Doctor: Using PC-Doctor
If, after you have tried all these steps, the drive still cannot read a commercial disc, the drive is probably bad and should be replaced.
How to Burn Files to Dvd Windows Xp
Source: https://support.hp.com/bg-en/document/c00365278
0 Response to "How to Burn Files to Dvd Windows Xp"
Post a Comment